Black Sequined Button Spider Embellishment
1 two-holed button (at least ½ “ in diameter)
1 Black pipe cleaner
1 Black medium sized brad (approx. 1/4 “)
1/2” length of black fine gauge craft wire
approximately 15 black sequins (amount depends
on button size)
6” black embroidery floss
scissors
wire cutters (jewelry makers)
tweezers
glue (one that will bind metal is recommended such
as Glossy Accents by Ranger)
white gel pen
Wooden skewer or similarly shaped object
needle and threader for floss (optional)
Step One:
Thread one end of the embroidery floss through one hole in the button and the other end through the other hole. Lay the button on your work surface as shown (Illus. 1) with the embroidery floss stretched out on either side of the
button.
Step Two:
Cut four 2.5 in. size lengths from the black pipe cleaner with wire cutters. Lay the lengths side by side and gather them all together by pinching in the middle with your thumb and forefinger (Illus. 2). Place the entire grouping of pipe cleaner lengths on top of the button making sure that there are equal amounts of pipe cleaner on either side of the button. Take both ends of the embroider floss and tie them together forming a knot and securing the pipe cleaner to the button (Illus. 3). Snip off the extra floss with your scissors. Turn the button over so the pipe cleaner is on the bottom and position the ends to resemble spider legs. (Note: You can use a product such as Fray Check on the ends of the pipe cleaner to cut down on the fraying.)
Step Three:
Bend the tongs on the back of the brad in one direction (being careful not to bend the brad too much because it will cause the tongs to break off) with the head of the brad tilted just a bit to allow room to tuck the edge of the button under (Illus 4). Place a small amount of glue on one side of the brad underneath the head. Place the brad against the button with the tongs sliding underneath the button and beneath the pipe cleaners (Illus 5). Set aside and allow glue to set for at least 10 minutes. (Note: If using Glossy Accents, you may need to allow more drying time. Read the product instructions.)
Step Four:
Fold the piece of craft wire in half. Using the wooden skewer, curve the ends of the wire inward to resemble spider fangs (Illus. 6). Place a small amount of glue under the head of the brad opposite the spider’s body and using tweezers arrange the wire as shown (Illus. 7).
Step Five:
Apply glue to the button, spreading it to cover the entire top of the button. Using the tweezers begin placing the sequins around the outer edge of the button allowing them to slightly extend over the edge. Continue applying the sequins in circles working toward the center and overlapping as you go (Illus. 8).
Allow the glue to dry completely. Then, using the white gel pen, you can draw small dot or dashes for the spider’s eyes. Use a strong adhesive such as a glue dot to attach the spider to your project.
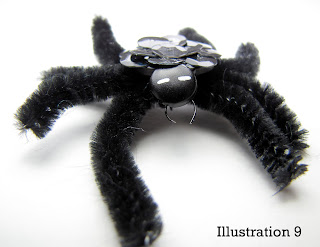
That’s it! Your finished spider should look like this (Illus. 9) Enjoy!


